Struggling to sever ties with a stubborn email account on your iPhone? You're not alone. When an email account decides to dig its heels in, preventing you from removing it, it can be a surprisingly frustrating experience. This guide cuts through the confusion, offering a comprehensive walkthrough for Troubleshooting Common Issues When Removing Email Accounts from iPhone, ensuring you reclaim control of your device.
Whether you're battling persistent notifications, grappling with a grayed-out "Delete Account" button, or simply trying to declutter your digital life, we'll equip you with the knowledge and steps to resolve these common frustrations. Consider this your definitive resource for a smooth, stress-free email account removal.
At a Glance: Your Troubleshooting Toolkit
- Backup First: Always secure contacts, calendars, and crucial emails before attempting removal.
- iOS Version Matters: Removal steps vary slightly between iOS 14 and newer versions (15, 16, 17).
- Basic Fixes: Often, a simple force quit, restart, or network check can resolve minor glitches.
- Common Culprits: Screen Time restrictions and Mobile Device Management (MDM) profiles frequently block deletions.
- Keychain Access: Forgotten passwords lurking in your iPhone's Keychain can sometimes cause issues.
- Last Resort: Factory reset is powerful but requires diligent backup and careful consideration.
Why You Might Need to Unlink: More Than Just Decluttering
Removing an email account from your iPhone isn't just about tidiness; it’s a critical step for several practical reasons:
- Enhanced Security: If your iPhone is lost or stolen, removing sensitive accounts prevents unauthorized access to your personal or work communications. It's a key part of securing your digital footprint.
- Streamlined Account Management: Perhaps you're switching email providers, consolidating accounts, or simply no longer use an old address. Cleaning up outdated accounts makes managing your active ones much simpler.
- Resolving Glitches: A misbehaving email account can cause a host of problems—sync errors, constant notification badges, or even the Mail app freezing. Removing and re-adding it can often be the most effective troubleshooting step.
- Optimizing Storage: Email accounts, especially those with large attachments, cache data on your device. Removing an account can free up valuable storage space, improving your iPhone's performance.
Remember, deleting an email account from your iPhone only removes it from that specific device. Your emails, contacts, and other data remain safe and accessible on the email provider's server (e.g., Gmail, Outlook.com, Yahoo Mail) when you log in via a web browser or another device.
Crucial Prep: Before You Tap 'Delete'
Before you initiate the removal process, a little preparation goes a long way to prevent data loss and future headaches. This isn't just a suggestion; it's a non-negotiable step to ensure a smooth transition.
Safeguard Your Digital Life: Back Up Critical Data
Many email accounts sync more than just mail—they often handle contacts, calendars, and notes. Removing an account can make this synced data disappear from your iPhone.
- Contacts: Export your contacts. You can sync them to iCloud (Settings > [Your Name] > iCloud > Contacts) or export them directly from your email provider's web interface. Alternatively, forward important contact information to a secondary email.
- Important Emails: Archive critical emails through your provider’s web interface or forward them to another account. Your iPhone stores only a cached copy; the originals live on the server, but direct access from your device will cease.
- Calendar Events: Ensure your crucial appointments are synced with iCloud or another active calendar service. Check the web interface of your email provider to confirm all events are stored there, not just locally on your iPhone.
Unraveling the Web: Check Linked Services
Your email account might be more integrated than you think. It could be tied to your Apple ID, used for the App Store, or serve as a login for various third-party apps like Slack, Zoom, or social media platforms.
- Apple ID: If the email account you're removing is your primary Apple ID, you'll need to change your Apple ID email address first. Go to appleid.apple.com to manage this. You cannot remove your primary Apple ID email from your iPhone directly.
- App Access: For iOS 15 and later, go to
Settings > Privacy & Security > Email. Review which apps have access to your Mail data and adjust as necessary. - Third-Party Apps: Log into third-party apps and see if they allow you to switch the associated email or log out entirely. You don't want to lose access to services because the underlying email account is gone.
Secure Your Keys: Save Login Credentials
You never know when you might need to access that email account again, even if it's just from a web browser. Note down passwords, especially for accounts that use two-factor authentication (2FA) or require app-specific passwords for third-party clients (like iPhone Mail). This ensures you're never locked out of your own account.
Your Step-by-Step Guide to Removing an Account
The process for removing an email account is generally straightforward, but it varies slightly depending on your iPhone's iOS version. Following these steps ensures you're on the right path. For more general guidance, you can always learn how to remove email accounts.
For Modern iOS (15, 16, and 17)
Apple streamlined the Mail settings in recent iOS versions, making the process intuitive:
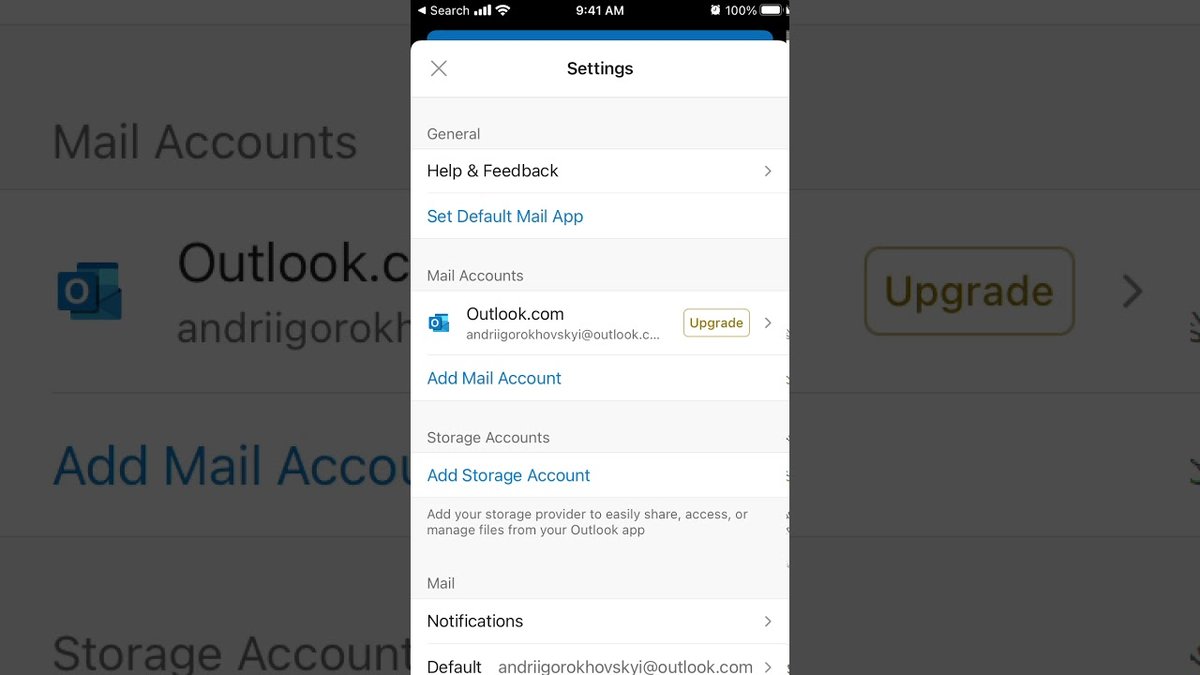
- Open the Settings app on your iPhone.
- Scroll down and tap on Mail.
- Tap Accounts. This will display a list of all email accounts configured on your device.
- Select the specific email account you wish to remove.
- At the bottom of the account details screen, tap Delete Account.
- A confirmation prompt will appear. Tap Delete from My iPhone to finalize the removal.
This action will remove the account and all its associated data (emails, contacts, calendars, notes synced through that account) from your iPhone only.
For Older iOS (Typically 11-14)
If you're running an older iOS version, the path is slightly different, but the intent remains the same:
- Navigate to the Settings app.
- Tap on Passwords & Accounts.
- Tap the specific account you want to remove from the list.
- Select Delete Account at the bottom.
- Confirm your decision when prompted.
Dealing with Third-Party Email Apps
If you're using dedicated apps like Gmail, Outlook, or Spark, the iPhone's native settings might not fully remove the account from within that app.
- In-App Removal: Open the specific third-party email app, go to its internal settings (often accessible via a gear icon or your profile picture), and look for an option to remove or sign out of the account.
- Work/School Accounts (MDM): Accounts managed by your employer or school (e.g., Microsoft 365, Google Workspace) might be tied to a device management profile. These accounts might need to be removed via
Settings > General > VPN & Device Management(orProfiles) or by consulting your IT department.
Confirming a Clean Break: Post-Removal Verification
Once you've followed the deletion steps, it's wise to double-check that the account is truly gone and not leaving any ghosts behind.
- Confirm Deletion: Open your Mail app, Calendar, and Contacts apps. The removed account should no longer appear, and any data previously synced through it should be gone. A quick restart of your iPhone (power off, then on) can often help refresh the system and confirm the removal.
- Clear Cached Data (Optional, but Recommended): Sometimes, residual cached data can linger. To clean this up:
- Go to
Settings > General > iPhone Storage. - Find and tap on Mail.
- If you see "Delete App," you can tap it to remove the Mail app entirely, then reinstall it from the App Store. This will clear all its local data. Be aware: this also means any accounts you want to keep will need to be re-added.
- Re-Add Account (If Necessary): If you removed the account as a troubleshooting step and now need to add it back:
- Go to
Settings > Mail > Accounts > Add Account. - Follow the prompts for your email provider.
- For accounts with 2FA enabled, you might need to generate an app-specific password from your email provider's security settings (e.g., Google Account Security > App Passwords) rather than using your main password.
When Things Go Sideways: Troubleshooting Common Issues Preventing Account Deletion
Sometimes, despite following all the steps, that email account just won't budge. This is where the real troubleshooting begins. These issues typically stem from a few common culprits.
Understanding the Hiccups: Common Root Causes
Before diving into solutions, it's helpful to understand why your iPhone might be clinging to that email account:
- Configuration Issues: Incorrect account settings, outdated passwords, or a corrupted local profile can prevent proper deletion.
- System-Level Errors: Occasionally, an iOS bug or a minor corruption in system files can interfere with account management.
- Restriction Policies: Screen Time limits, parental controls, or Mobile Device Management (MDM) profiles (often on work or school devices) can block account changes.
- Account Authentication Issues: Problems verifying your identity with the email provider's servers can create roadblocks.
First Aid for Stubborn Accounts: Basic Troubleshooting Steps
Always start with these fundamental fixes. They're quick, easy, and often resolve minor software glitches.
- Force Quit the Mail App:
- For iPhones with Face ID (no Home button): Swipe up from the bottom of the screen and pause in the middle. Swipe the Mail app card upwards to close it.
- For iPhones with a Home button: Double-press the Home button, then swipe the Mail app card upwards.
- Restarting the app can clear temporary errors.
- Restart the iPhone: The classic "turn it off and on again" is incredibly effective.
- For iPhones with Face ID: Press and hold the Side button and either Volume button until the power-off slider appears. Drag the slider, then wait 30 seconds for your iPhone to completely shut down. Press and hold the Side button again until you see the Apple logo.
- For iPhones with a Home button: Press and hold the Side (or Top) button until the slider appears. Drag to power off, wait 30 seconds, then press the Side (or Top) button to restart.
- Verify Internet Connectivity: A stable internet connection (Wi-Fi or cellular) is crucial for your iPhone to communicate with email servers and Apple's services during account management.
- Try opening a website in Safari or sending a test message. If your connection is spotty, try switching Wi-Fi networks or toggling cellular data.
- Check Account Credentials:
- Go to
Settings > Mail > Accounts > [Your Account]. - Look for any alerts or warnings about incorrect passwords or settings. Try re-entering your password, ensuring there are no typos. If you suspect your password might be compromised, reset it directly on your email provider's website first.
- Check for iOS Updates: Apple frequently releases iOS updates that include bug fixes and performance improvements. An outdated iOS version could be causing your issue.
- Go to
Settings > General > Software Update. If an update is available, install it. Ensure your iPhone is charged and connected to Wi-Fi.
Digging Deeper: Advanced Solutions for Persistent Problems
If the basic steps don't resolve your issue, it's time to explore more advanced troubleshooting techniques.
"Delete Account" Option Grayed Out
This is a common and particularly frustrating issue, often indicating a restriction is in place.
- Cause: The "Delete Account" button is inactive due to Screen Time restrictions or a Mobile Device Management (MDM) profile installed on your device.
- Fix: Screen Time:
- Go to
Settings > Screen Time. - Tap
Content & Privacy Restrictions. You may need to enter your Screen Time passcode. - Scroll down to
Account Changes. Ensure it is set to Allow. If it's set to "Don't Allow," toggle it to "Allow."
- Fix: Mobile Device Management (MDM):
- Go to
Settings > General > VPN & Device Management(or on older iOS,ProfilesorDevice Management). - Look for any profiles you don't recognize or that are associated with a former employer/school.
- Tap on the profile and select Remove Profile. You'll likely need to enter your iPhone's passcode.
- Important: For corporate or school devices, always consult your IT department before removing an MDM profile. Doing so without permission can remove access to essential services or violate company policy.
Account Reappears After Deletion
You delete it, you restart, and poof! It's back. This ghostly reappearance usually points to an external force reinstalling the account.
- Cause: A device management profile (MDM) is designed to automatically configure and manage accounts, often reinstalling them if removed. This is common in organizational settings.
- Fix:
- Navigate to
Settings > General > VPN & Device Management. - Identify and remove any unfamiliar or irrelevant profiles. As with the "grayed out" issue, exercise caution with MDM profiles on work/school devices. Your IT department is the first point of contact.
Residual Notifications or Sync Errors
Even after an account appears deleted, you might still get phantom notifications or see sync errors related to it.
- Fix: Reset Network Settings: This can clear up stubborn network-related configurations that might be clinging to the old account.
- Go to
Settings > General > Transfer or Reset iPhone. - Tap
Reset, thenReset Network Settings. - Warning: This action will erase all saved Wi-Fi passwords, VPN configurations, and cellular settings. You'll need to reconnect to your Wi-Fi networks afterwards. It does not erase personal data.
Clearing the Digital Trail: Removing Keychain Entries
Your iPhone's Keychain stores passwords and account credentials, helping you log in quickly. Sometimes, a corrupted or outdated Keychain entry can confuse your iPhone about an account's status.
- Go to
Settings > Passwords. You'll need to authenticate with Face ID, Touch ID, or your passcode. - In the search bar at the top, type the domain of your email provider (e.g., 'gmail.com', 'outlook.com', 'yahoo.com').
- Carefully review the list. If you find entries related to the email account you're trying to remove, tap on them.
- Tap Edit in the top right, then Delete Password (or "Delete Keychain Item") for each relevant entry.
- Confirm the deletion when prompted.
iCloud's Role: Deleting Account from iCloud (if applicable)
For some email services, especially older ones or those deeply integrated with Apple, your iCloud account might be synchronizing the email setup.
- Cause: While less common for major email providers, some configurations might link an email service through iCloud settings.
- Fix:
- Log in to iCloud.com using a web browser on a computer.
- Go to Mail settings within iCloud.
- Look for options to manage or remove linked email accounts directly from the iCloud portal. This is more likely to apply to custom domain email associated with iCloud or very old
.Mac/@me.comaccounts.
Network Niggles: Examining DNS Settings
While less common, incorrect or malicious DNS settings can sometimes interfere with your iPhone's ability to communicate with email servers or Apple's account management services. This is a deeper network dive.
- Go to
Settings > Wi-Fi. - Tap the 'i' icon next to your currently connected Wi-Fi network.
- Scroll down to Configure DNS and tap it.
- Change the setting from "Automatic" to Manual.
- If there are existing DNS servers listed, tap the red minus button to remove them.
- Tap
Add Serverand enter Google's Public DNS servers:8.8.8.8and8.8.4.4. You can also use Cloudflare's1.1.1.1and1.0.0.1. - Tap
Savein the top right. - Test if you can now remove the email account. Remember to switch DNS back to "Automatic" or your preferred settings if this doesn't resolve the issue.
The Nuclear Option: Restoring to Factory Settings
If all else fails, a factory reset is the ultimate troubleshooting step. It wipes your iPhone clean, returning it to its original state. This should only be considered as a last resort, after you have exhausted all other options and performed a complete backup.
- Crucially, back up your iPhone first! Use iCloud (
Settings > [Your Name] > iCloud > iCloud Backup > Back Up Now) or connect your iPhone to a computer and use Finder (macOS Catalina or later) or iTunes (older macOS/Windows). Do not skip this step. - Go to
Settings > General > Transfer or Reset iPhone. - Tap
Erase All Content and Settings. - Follow the on-screen prompts. You'll need to enter your passcode and Apple ID password.
- Once the reset is complete, set up your iPhone as new. Before restoring from your backup, try to add (or verify the absence of) the problematic email account. If the issue is resolved, it indicates something in your backup might have been corrupted. You might then selectively restore data or start fresh.
For the Tech-Savvy: Analyzing Device Logs
For advanced users comfortable with developer tools, examining device logs can provide specific error codes or messages that pinpoint the exact cause of the problem.
- Connect your iPhone to a computer that has Xcode installed (available for free from the Mac App Store).
- Open Xcode, then go to
Window > Devices and Simulators. - Select your iPhone from the list on the left.
- Click the
Open Consolebutton (usually at the bottom right). - As you attempt to delete the email account, monitor the logs for entries related to
Mail,accountsd(the daemon responsible for account management), or the domain of your email provider. These logs can reveal low-level errors that aren't visible through the standard user interface.
Essential Takeaways You Can't Ignore
Successfully troubleshooting a stubborn email account removal relies on understanding these fundamental facts:
- On-Device vs. Server: Deleting an email account from your iPhone is a localized action. It has no bearing on the existence of your emails or the account itself on your email provider's servers. You can always access your mail via the web.
- Interconnected Services: Remember that email accounts often act as hubs for other data like contacts, calendars, and notes. Be prepared to reconfigure these services or ensure they're linked to a different, active account after removal.
- No Bulk Deletion: iOS is designed for individual account management. There isn't a feature to remove multiple email accounts simultaneously; each must be addressed one by one.
Moving Forward with a Clean Slate
Successfully removing a troublesome email account from your iPhone brings a sense of digital relief and enhanced security. By methodically working through the preparation steps, basic fixes, and advanced troubleshooting techniques outlined here, you can overcome even the most stubborn account deletion challenges.
If, after all these steps, you still encounter issues, consider reaching out to Apple Support directly. Provide them with details of the troubleshooting you've already attempted, and they can offer more personalized assistance, potentially even diagnosing hardware-related issues if necessary. With patience and persistence, your iPhone will be free of unwanted email accounts, allowing you to manage your digital communications with confidence.